Page 2 of 3
Re: Remove shine from photo of oil painting
Posted: April 2nd, 2015, 12:25 pm
by den
For image 3:
1) crop/Warp the starting image leaving the light toned border... ...Warp [as well as the final Resize for publication] will soften spectral highlights and the border will provide a guide for adjusting an even HSV-V tone for the image as the top half is darker than the lower half...
2) create a series of gamma-correct virtual image exposure image versions by: a) create a 'linear' gamma (gamma=1.00) version of the starting image; b) use the RGB Brightness Curve to create +2ev, +1ev, -1ev, -2ev intermediate image versions of the 'linear' gamma image version; and c) restore gamma to 2.22 for all 'linear' image versions...
3) Use the Stack Images transform and Input the 5 virtual exposure images corrected to gamma = 2.22, ie, -2ev, -1ev, 0ev, +1ev, and +2ev... ...adjust each Input Brightness and Density curves as needed with a final adjustment using the Finalizing HSV-V curve.
4) Stack Images adjusts HSV-V tones, so adjust HSV-S saturation to preference... ...perhaps using HSV-S and HSV-H Color Curves...
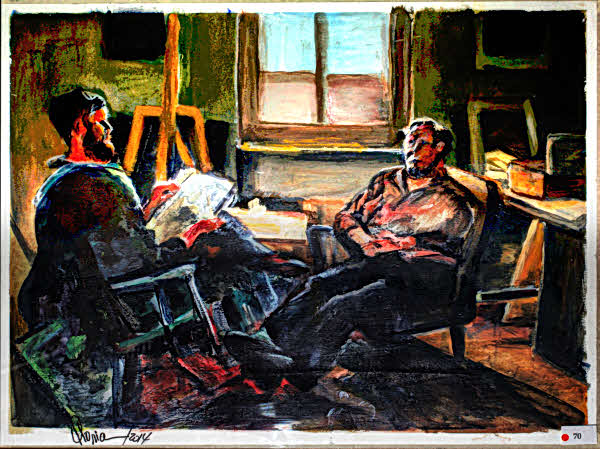
- P3281480_jpg_StackImages_5virtualExposures.jpg (75.81 KiB) Viewed 11313 times
As an Alternate: use SNS-HDR with Default and Night presets, then preference PWP Composite-Blend perhaps with a mask where SNS-HDR does the image blending and tone-mapping of the 5 virtual image exposures rather than Stack Images...
...den...
Re: Remove shine from photo of oil painting
Posted: April 3rd, 2015, 3:19 am
by davidh
Jonathan's clever two step mask undoubtedly deserves its place in the next Ctein's update on his book of image restoring.
david
Re: Remove shine from photo of oil painting
Posted: April 4th, 2015, 7:32 pm
by Robert Schleif
Applying the following selective color correction also helps the image when using a mask to confine the correction to the upper left quadrant. The correction slightly increases the saturation of colors near white without changing their brightness and reduces the brightness of pure white by about 15%.
Re: Remove shine from photo of oil painting
Posted: April 5th, 2015, 4:28 am
by tonygamble
Thanks Robert.
Another good idea.
Tony
Re: Remove shine from photo of oil painting
Posted: November 23rd, 2015, 2:59 am
by tonygamble
I'm working through these suggestions and am currently stuck on Jonathan's sequence. Could someone help me, please.
I created the first mask (1) and saved it. I put the mask on the shiny area. Which is why I inverted it later!
I then did Combine Masks to add the mask back to the image and I inverted it before moving to (2). I inverted it so the non shine area was masked and leaving the area with shine unmasked so I could work on it in stage (2) - was that right?
I then clicked on Overlap and opened the Color Range slider and changed the drop down to HSL. I am not sure which of the three sliders to alter and in which direction. I assume I use the top/white slider. Maybe a screen shot of the way to get 50% would help.
Once I have that setting do I click Apply? Do I need to Save before I go on to the next step (3)
(3) is, I assume using Transformation/Grey/Brightness Curve. I know I need to change it to HSL. Again a screen shot of the graph to drop the brightness would help.
I am sorry to sound dim but this is a new aspect of using PWP to me. I'll look at Den's idea next but this seemed rather simpler at first read.
Thanks in advance for any help coming.
Tony
Re: Remove shine from photo of oil painting
Posted: November 23rd, 2015, 9:14 am
by doug
Tony
I'm sure someone will chime in with a more explicit explanation. But to get you started, Jonathan's method does not finalize the creation of a mask at the end of Step 1 (i.e. do not click OK after roughly outlining the general area where the more refined mask is intended to be). After generally outlining the area, you do not click OK to finalize a mask. Instead, you click the "overlap" button while this general-area mask is still showing. With that button depressed, you move forward to implement a mask based on some other mask-creating function such as tonal limits in the brightness curve or a color selection. This is the Step 2 part of the process. Then, only after clicking Apply to this second step, do you finally click OK. This creates a mask that will be limited to only the areas within the Step 1 rough boundaries that meet the more refined definition provided by the Step 2 selections.
Re: Remove shine from photo of oil painting
Posted: November 23rd, 2015, 10:24 am
by tonygamble
Thanks Doug,
That has taken me a step forward.
I created the mask over the area with shine.
I used Overlap and the Color Range to pick out the shiny bits.
I am not sure what to do next.
If I invert I can see the shiny bits masked but so is the main part of the image that was not originally masked. I guess this is the wrong route so I'll wait for more help.
Tony
Re: Remove shine from photo of oil painting
Posted: November 23rd, 2015, 11:52 am
by doug
I'm not quite sure why you inverted the mask, Tony. A mask "image" includes black and white parts that are simply reversed upon inverting. You do know, of course, that in most transformations, immediately to the left of the box where you input the mask there is a horizontal scale. There is a white pointer on top of the scale and a black pointer on the bottom. If the white slider is at the far right (100%) and the black slider at the far left (0%), whatever functions that are performed by that transformation will be applied only to the areas beneath the white areas of the mask. If you move the sliders to the opposite ends (i.e. black at 100% and white at 0%) the transformation will be applied only to the areas beneath the black areas of the mask.
Seems to me like the only things that would be affected by reversing the sliders versus inverting the mask would be if you blurred or feathered edges during the creation of the mask. Those adjustments initially affect only the white areas of the mask. I'm not sure whether those adjustments to the mask characteristics are also reversed upon inversion.
As to how this all applies to your specific objective for this image, we'll both have to wait for others to weigh in.
Re: Remove shine from photo of oil painting
Posted: November 24th, 2015, 2:31 am
by tonygamble
Thanks Doug.
I now keep the mask unsaved and have a workflow that is working.
I create the mask over the troublesome area.
I click overlap.
I click Color Range and select HSL
I move the bottom slider so that around 1/3 is black a the left.
I click Apply and the mask then only shows on the worst bits.
I click on the image and use the Transformation/Grey/Brightness Curve. I move the bottom left corner of the graph to the right until it matches the bad bits to their surrounding tone.
To get it right seems to require several stages but as long as I am using a big file like a TIF I guess I am keeping the rest of the detail.
It may not be quite what JS suggested but it seems to work. Bravo.
Tony
Re: Remove shine from photo of oil painting
Posted: April 30th, 2018, 10:44 am
by tonygamble
Can anyone be bothered to revisit this thread.
I am trying Jonathan's method that uses the mask that is not saved until the overlap is applied.
Reading my last post it seemed I did crack it once ages ago.
Now I cannot get the overlap to make any difference to the mask I have applied.
This is the print with the shine at the two top corners.
http://www.tonygamble.uk/aaShineProblem/SDIM0606.jpg
I get as far as this. Can someone tell me, or post a screenshot of what I should do when I get to here?
http://www.tonygamble.uk/aaShineProblem/Shine.JPG
All help appreciated as usual.
Tony