Add a Brushed Metal texture to a < FullRange image

Please use this forum to post bug reports, feature requests, tips, etc. for beta versions of Picture Window Pro 8

Moderator: jsachs

Locked
den
Posts: 856
Joined: April 25th, 2009, 6:33 pm
What is the make/model of your primary camera?: Canon EOS-350D/Fuji X100T
Location: Birch Bay near Blaine, WA USA

Add a Brushed Metal texture to a < FullRange image

Post by den »

Ref: (1) Marpel's Post: viewtopic.php?f=11&t=2155&sid=0104be5f3 ... 6090#p8692
...As I am, still, unfamiliar with this transformation [Add Texture], I am wondering if there are any suggestions to mitigate the clipping without losing so much of the texture effect...
Adding a Brushed Metal texture to a less than Full Range image...

1) Open the Texture image and the image to which it is to be applied, Img 1
2) Fit and Scale the Texture image to Img 1 with a Composite-Blend at a 100% Amount Overlay and 4-point Alignment
3) 100% Amount Composite-Hard Light the Texture image with Img 1
4) Adjust for preference opacity: Composite-Blend the resuting 3) image with Img 1

This workflow is suitable for Textures that have a normalized gray histogram distribution above and below a 50% percent tone.

The Luminance channel histogram is used for analysis because Composite-Hard Light or Composite-Soft Light blends occur in the RGB color space.

Tile/Crop and Resize could be used for/in combination with the Step 2) Composite-Blend as the suggested 4-point Alignment may produce too coarse of a Texture.

The Step 2) Texture image could also have a Tint applied if preference.

Composite-Soft Light could be used in Step 3), possibly making the Step 4) opacity Composite-Blend unnecessary.

Step 1 illustration: Img 1 and Texture image; Img 1 Luminance histogram
Screenshot (1).jpg
Screenshot (1).jpg (67.15 KiB) Viewed 2657 times
...
Step 2 illustration: Texture image fit to Img 1; Texture image Luminance histogram
Screenshot (2).jpg
Screenshot (2).jpg (67.67 KiB) Viewed 2657 times
...
Original Post 1 of 2 -- continued in Post 2
Last edited by den on August 21st, 2019, 6:38 pm, edited 1 time in total.
den
Posts: 856
Joined: April 25th, 2009, 6:33 pm
What is the make/model of your primary camera?: Canon EOS-350D/Fuji X100T
Location: Birch Bay near Blaine, WA USA

Re: Add a Brushed Metal texture to a < FullRange image

Post by den »

Original Post 2 of 2
...
Step 3 illustration: Composite-Hard Light blend; Textured image Luminance histogram
Screenshot (3).jpg
Screenshot (3).jpg (72.85 KiB) Viewed 2655 times
...
Step 4 illustration: opacity Composite-Blend; adjusted Textured image Luminance histogram
Screenshot (4).jpg
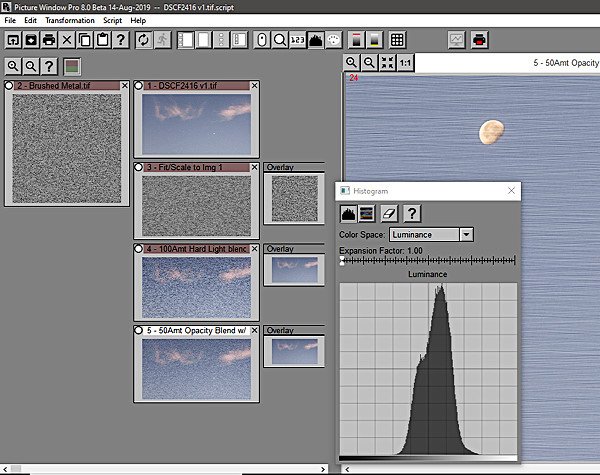
Screenshot (4).jpg (71.22 KiB) Viewed 2655 times
...
Script Text: Color Management settings and File locations will be updated when the Script is used and re-saved on your system____________________________________________

script 1.0
PWP_Version ″Picture Window Pro 8.0 Beta 14-Aug-2019″
color_management enabled 1 on_mismatch 0 on_batch_mismatch 1 acs_profile ″sRGB Color Space Profile.icm″ gray_acs_profile ″Gamma 2.2.icm″ wcs_profile ″sRGB Color Space Profile.icm″ gray_wcs_profile ″Gamma 2.2.icm″ monitor_curves_file ″″ monitor_curves_enabled 0

image index 1 caption ″DSCF2416 v1.tif″ saved_as ″″ saved_on ″″ parent -1 bypass -1 same_size 0 size_specific 0 breakpoint 0 n_inputs 0 n_masks 0 command ‴file_open 0 n_files 1 current 0 show_progress 1 from_default 0 file1 ″C:\Users\birch\Pictures\2019 Photos\190820 Early Morning Moon\DSCF2416 v1.tif″ time1 ″20190820 173457″‴
end_image

image index 2 caption ″Brushed Metal.tif″ saved_as ″″ saved_on ″″ parent -1 bypass -1 same_size 0 size_specific 0 breakpoint 0 n_inputs 0 n_masks 0 command ‴file_open 0 n_files 1 current 0 show_progress 1 from_default 0 file1 ″C:\Users\birch\Documents\Picture Window Pro\Textures\Misc\Simulated Brushed Metal.tif″ time1 ″20160225 001730″‴
end_image

image index 3 caption ″Fit/Scale to Img 1″ saved_as ″″ saved_on ″″ parent 1 bypass 0 same_size 1 size_specific 0 breakpoint 0 n_inputs 1 n_masks 2 command ‴composite 0 operation 0 alignment 5 nalign 4 label 1 overlay_color ffffff overlay_amount 1 -1 0 0 ″Overlay Amount:″ ″Overlay Mask″ amount 1 -1 0 0 ″Amount:″ ″Base Mask″ display 2 sync_scroll 1 auto_preview 1 ix1 0.0000 iy1 0.0000 ox1 0.0000 oy1 0.0000 ix2 1.0000 iy2 0.0000 ox2 0.5575 oy2 0.0000 ix3 0.0000 iy3 1.0000 ox3 0.0000 oy3 0.9913 ix4 1.0000 iy4 1.0000 ox4 0.5575 oy4 0.9913‴
input base_image 3 input_number 0 index 2 caption ″Overlay″
end_image

image index 4 caption ″100Amt Hard Light blend″ saved_as ″″ saved_on ″″ parent 3 bypass 0 same_size 1 size_specific 0 breakpoint 0 n_inputs 1 n_masks 2 command ‴composite 0 operation 6 alignment 0 nalign 0 label 1 overlay_color ffffff overlay_amount 1 -1 0 0 ″Overlay Amount:″ ″Overlay Mask″ amount 1 -1 0 0 ″Amount:″ ″Base Mask″ display 2 sync_scroll 1 auto_preview 1 ‴
input base_image 4 input_number 0 index 1 caption ″Overlay″
end_image

image index 5 caption ″50Amt Opacity Blend w/ Img 1″ saved_as ″C:\Users\birch\Pictures\Imaging Tutorials\Adding Texture\DSCF2416 Brushed Metal\DSCF2416 v1.tif″ saved_on ″21-Aug-2019 15:29:21″ parent 4 bypass 0 same_size 1 size_specific 0 breakpoint 0 n_inputs 1 n_masks 2 command ‴composite 0 operation 0 alignment 0 nalign 0 label 1 overlay_color ffffff overlay_amount 0.5 -1 0 0 ″Overlay Amount:″ ″Overlay Mask″ amount 1 -1 0 0 ″Amount:″ ″Base Mask″ display 2 sync_scroll 1 auto_preview 1 ‴
input base_image 5 input_number 0 index 1 caption ″Overlay″
end_image

end

____________________________________________________________________

Currently, this is my prefered method to add the "...Textures/Film Grain/..." texture images of PWP8's Settings folder when preference.

...den...
Marpel
Posts: 692
Joined: September 13th, 2009, 3:19 pm
What is the make/model of your primary camera?: Nikon D810
Location: Port Coquitlam, British Columbia

Re: Add a Brushed Metal texture to a < FullRange image

Post by Marpel »

Den,

Thanks for your input on this topic. I have tried your suggestion and it gives excellent results.

It seems the Add Texture transform, when used with some of the textures (haven't tried all), among them brushed metal, is like Composite > Hard Light on steroids. The result is strong clipping in the highlights, even when both the texture image and the principle image are quite narrow in DR. Using the same two files, your suggested method, even if I then Composite > Soft Light on itself, shows no signs of clipping.

One question, though, your point 4) "Adjust for preference opacity; Composite - Blend the resulting 3) image with img 1". Is this not the same as just lowering the opacity in the previous Composite step?? Or is there a difference in the end product?

Thanks,

Marv
den
Posts: 856
Joined: April 25th, 2009, 6:33 pm
What is the make/model of your primary camera?: Canon EOS-350D/Fuji X100T
Location: Birch Bay near Blaine, WA USA

Re: Add a Brushed Metal texture to a < FullRange image

Post by den »

One question, though, your point 4) "Adjust for preference opacity; Composite - Blend the resulting 3) image with img 1". Is this not the same as just lowering the opacity in the previous Composite step?? Or is there a difference in the end product?
Changing opacity of a Composite-Hard Light blend [Step 3] differs from changing opacity of a Composite-Blend [Step 4]. If the Composite-Hard Light blend is done at less than 100% Amount for both the Input [Texture image] and Overlay [Img 1], the Hue/Saturation [colors] of Img 1 seem to loose their contrasts for the resulting transformed image with added Texture. I am not sure of the mathematical reasons, just an observation.

The Step 4 Composite-Blend of the resulting Step 3 image and Img 1 will result in only changing the Values of the added Texture [lowering its contrast] while leaving Hue/Saturation [color] essentially unchanged.

The suggested workflow is a carry-over from PWP7 that I have used for many years and truthfully do not recall all of the reasoning... ...just know that the results are generally pleasing when adding 50% toned normalized Textures to both BW and Color images.

...den...
jsachs
Posts: 4210
Joined: January 22nd, 2009, 11:03 pm

Re: Add a Brushed Metal texture to a < FullRange image

Post by jsachs »

For the next release, I have added a feature to the Autorange command to let you set the dynamic range. If you run this after texturing an image, you can reset the dynamic range. You could also use Levels and Color to do this.
Jonathan Sachs
Digital Light & Color
Locked